3D Printing Helmet Movie Prop
- Jun 22, 2020
- 1 min read
Updated: Sep 18, 2024
We wanted to share with you the stages and process by which we fabricated a custom 3D printed helmet, Star-Wars-like movie prop.
We started out by designing the helmet using Fusion360 3D CAD program


Here is the rendering of the 3D CAD software showing how the end result will look like


Next step was to 3D print all parts on our 3D printer using ABS material


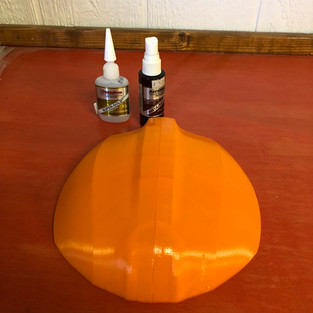
We then glued all layers together, using Superglue, to create the unified helmet.
We sanded the prop using an orbital sander as well as 400 Grit sand paper.


Once done with sanding, we applied Spackle over all layers glued lines to get rid of the visible print lines, and then sanded some more


In the next step, we sprayed 6 coats of filler primer. We sanded again each layer once dried to get the desired smooth finish


Once the helmet was smooth enough we painted it using automotive metallic paint


The last stage was to add the visor. We used a thick one that would not bend yet would still be transparent


If you want to see more of our 3D printing projects and our prototyping projects, visit us at https://www.wecutfoam.com/3d-printing-foam-modeling and https://www.wecutfoam.com/cnc-prototyping
#3D #3Dprinting #prop #props #prototype #prototypes #prototyping #helmet #custom #customprop #design #3Ddesign #CAD #ABS


